Shop this story
Cheese Grating: A Complete Guide For Beginners
Introduction
Cheese, a versatile and beloved ingredient in countless cuisines around the globe, adds richness and depth to dishes. One of the best ways to incorporate cheese into your culinary creations is by grating it. However, the art of cheese grating goes beyond just a simple task; it requires skill, the right tools, and an understanding of different cheese varieties. In this comprehensive guide, we will delve into the world of cheese grating, providing beginners with the knowledge they need to elevate their culinary endeavors.
Choosing the Right Cheese Cutter: A Crucial Decision
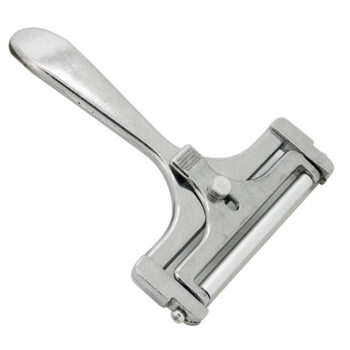
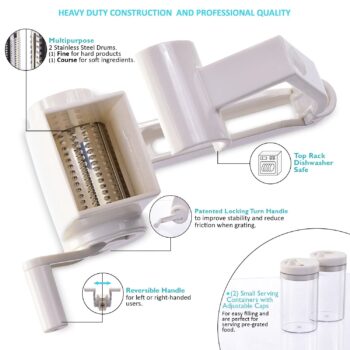
Before we dive into the art of grating, let’s first explore the importance of selecting the right cheese cutter. The market offers a variety of options, each designed for specific purposes. Among them, the Cheese Cutter stands out as a versatile tool that can handle different cheese textures with precision.
The Cheese Cutter features a sharp, stainless steel blade ideal for both soft and hard cheeses. Its ergonomic design ensures a comfortable grip, allowing for smooth and controlled movements during the grating process. Whether you’re crafting a delicate Parmesan topping or a fluffy mound of cheddar for your macaroni and cheese, the Cheese Cutter is a reliable companion.
Understanding Cheese Textures
Cheese comes in various textures, ranging from soft and creamy to hard and crumbly. Each texture requires a specific grating technique to achieve optimal results. Let’s explore the nuances of grating different cheese textures.
Soft Cheese:
When working with soft cheeses like Brie or Camembert, consider using the finest side of your Cheese Cutter. Soft cheeses are delicate and prone to mushiness, so a gentle touch is essential. A light, downward motion against the grater will yield fine, fluffy shreds that effortlessly melt into your dishes.
Hard Cheese:
For hard cheeses such as Parmesan or aged Gouda, opt for the coarser side of your Cheese Cutter. Applying a bit more pressure, grate the cheese in a steady, rhythmic motion. The result will be robust, textured shreds perfect for sprinkling over salads or enhancing the flavor of hearty pasta dishes.
Medium Texture Cheese:
Semi-hard cheeses like cheddar or Swiss fall into the middle ground. Utilize both sides of your Cheese Cutter, starting with the fine side for a light, initial grate, and finishing with the coarse side for a heartier texture. This approach ensures a well-balanced, versatile cheese topping.
How to Grate Cheese: Step-by-Step Guide
Now that we’ve covered the essentials, let’s walk through the step-by-step process of how to grate cheese using your trusty Cheese Cutter.
Step 1: Choose the Right Cheese
Begin by selecting the type of cheese that best suits your dish. Consider the texture and flavor profile you desire, whether it’s the creaminess of fresh mozzarella or the sharpness of aged cheddar.
Step 2: Prep Your Cheese Cutter
Ensure your Cheese Cutter is clean and dry before starting. The cleanliness of your tools contributes to the overall hygiene of your kitchen and the quality of your grated cheese.
Step 3: Cut the Cheese
Before grating, cut the cheese into manageable pieces. This not only facilitates the grating process but also prevents the cheese from becoming unwieldy. For larger blocks, consider creating smaller, more manageable sections.
Step 4: Hold the Cheese Cutter Properly
Grasp the Cheese Cutter firmly, ensuring a secure grip. Hold the handle with one hand and use the other to guide the cheese against the grater. Maintaining control is crucial for safety and achieving consistent results.
Step 5: Choose the Right Side
Depending on the cheese texture, select the appropriate side of your Cheese Cutter. For softer cheeses, start with the fine side; for harder cheeses, begin with the coarse side.
Step 6: Grate with Precision
With a steady hand, begin grating the cheese in a controlled, downward motion. Apply even pressure to create uniform shreds. Take your time, and avoid rushing the process to maintain quality and safety.
Step 7: Switch Sides for Versatility
If you’re looking for a mix of textures, switch to the opposite side of the Cheese Cutter to achieve a well-rounded result. This step is particularly useful when dealing with semi-hard cheeses.
Step 8: Store Appropriately
After grating, store any leftover cheese properly. For optimum freshness, transfer the grated cheese to an airtight container and refrigerate. This prevents moisture absorption and preserves the cheese’s flavor and texture.
Common Mistakes to Avoid
As with any culinary skill, mastering the art of cheese grating involves learning from mistakes. Here are some common errors to steer clear of:
- Using the Wrong Side: Choosing the wrong side of your Cheese Cutter can result in inconsistent textures. Be mindful of the cheese variety and adjust accordingly.
- Ignoring Block Size: Attempting to grate an entire block of cheese at once can lead to uneven results. Cut the cheese into smaller pieces for better control.
- Neglecting Cleanliness: A dirty Cheese Cutter can taint the flavor of your cheese and compromise hygiene. Regularly clean and dry your tools for optimal results.
- Rushing the Process: Grating cheese is a deliberate process that requires patience. Rushing can lead to uneven shreds and increase the risk of accidents.
- Storing Improperly: Grated cheese exposed to air can lose its freshness quickly. Store it in an airtight container to preserve its flavor and prevent moisture absorption.
Conclusion
In the world of culinary arts, attention to detail can make all the difference. Mastering the art of cheese grating with the right Cheese Cutter and techniques allows you to add a layer of sophistication to your dishes. Whether you’re a professional chef or a home cook, incorporating finely grated cheese into your recipes will undoubtedly elevate your culinary creations to new heights.
Equip yourself with the knowledge gained from this comprehensive guide, and embark on a flavorful journey where every dish boasts the perfect touch of grated cheese. The next time you pick up your Cheese Cutter, do so with confidence, knowing that you have the skills to create a symphony of flavors that will impress even the most discerning palates in the world of fine dining. Happy grating!
Further reading

How to Use a Nutcracker Like a Pro

The Ultimate Guide To Choosing a Fish Scaler
Leave a comment